Microsoft Cloud Workshops

Serverless architecture

Manual resource deployment and setup guide

November 2021

Information in this document, including URL and other Internet Web site references, is subject to change without notice. Unless otherwise noted, the example companies, organizations, products, domain names, e-mail addresses, logos, people, places, and events depicted herein are fictitious, and no association with any real company, organization, product, domain name, e-mail address, logo, person, place or event is intended or should be inferred. Complying with all applicable copyright laws is the responsibility of the user. Without limiting the rights under copyright, no part of this document may be reproduced, stored in or introduced into a retrieval system, or transmitted in any form or by any means (electronic, mechanical, photocopying, recording, or otherwise), or for any purpose, without the express written permission of Microsoft Corporation.

Microsoft may have patents, patent applications, trademarks, copyrights, or other intellectual property rights covering subject matter in this document. Except as expressly provided in any written license agreement from Microsoft, the furnishing of this document does not give you any license to these patents, trademarks, copyrights, or other intellectual property.

The names of manufacturers, products, or URLs are provided for informational purposes only and Microsoft makes no representations and warranties, either expressed, implied, or statutory, regarding these manufacturers or the use of the products with any Microsoft technologies. The inclusion of a manufacturer or product does not imply endorsement of Microsoft of the manufacturer or product. Links may be provided to third party sites. Such sites are not under the control of Microsoft and Microsoft is not responsible for the contents of any linked site or any link contained in a linked site, or any changes or updates to such sites. Microsoft is not responsible for webcasting or any other form of transmission received from any linked site. Microsoft is providing these links to you only as a convenience, and the inclusion of any link does not imply endorsement of Microsoft of the site or the products contained therein.

© 2021 Microsoft Corporation. All rights reserved.

Microsoft and the trademarks listed at https://www.microsoft.com/legal/intellectualproperty/Trademarks/Usage/General.aspx are trademarks of the Microsoft group of companies. All other trademarks are property of their respective owners.

Contents:

Serverless architecture manual resource deployment and setup guide

Duration: 30 minutes

This guide provides instructions for manually performing Task 2 (Run ARM template to provision lab resources) of the before the hands-on lab guide. The step-by-step directions below manually provision and configure the resources created by the ARM template.

Ensure all resources use the same resource group for easier cleanup.

Important: Many Azure resources require globally unique names. Throughout these steps, you will see the word “SUFFIX” as part of resource names. You should replace this with your Microsoft alias, initials, or other value to ensure uniquely named resources.

Requirements

Task 1: Provision an Azure Data Lake Storage Gen2 account

  1. In the Azure portal, select the Show portal menu icon and then select +Create a resource from the menu.
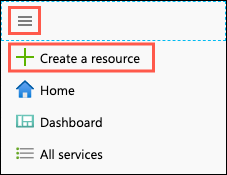
    The Show portal menu icon is highlighted, and the portal menu is displayed. Create a resource is highlighted in the portal menu.
    The Show portal menu icon is highlighted, and the portal menu is displayed. Create a resource is highlighted in the portal menu.
  2. Enter “storage account” into the Search the Marketplace box, select Storage account from the results, and then select Create.
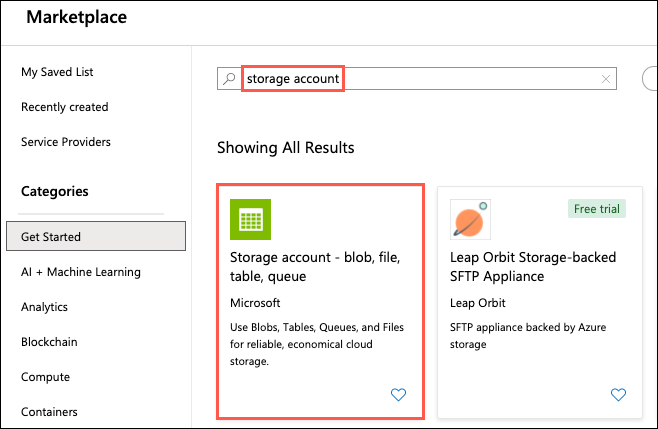
    “Storage account” is entered into the Search the Marketplace box. Storage account is selected in the results.
    “Storage account” is entered into the Search the Marketplace box. Storage account is selected in the results.
  3. On the Create storage account Basics tab, enter the following:

    Project Details:

    Instance Details:
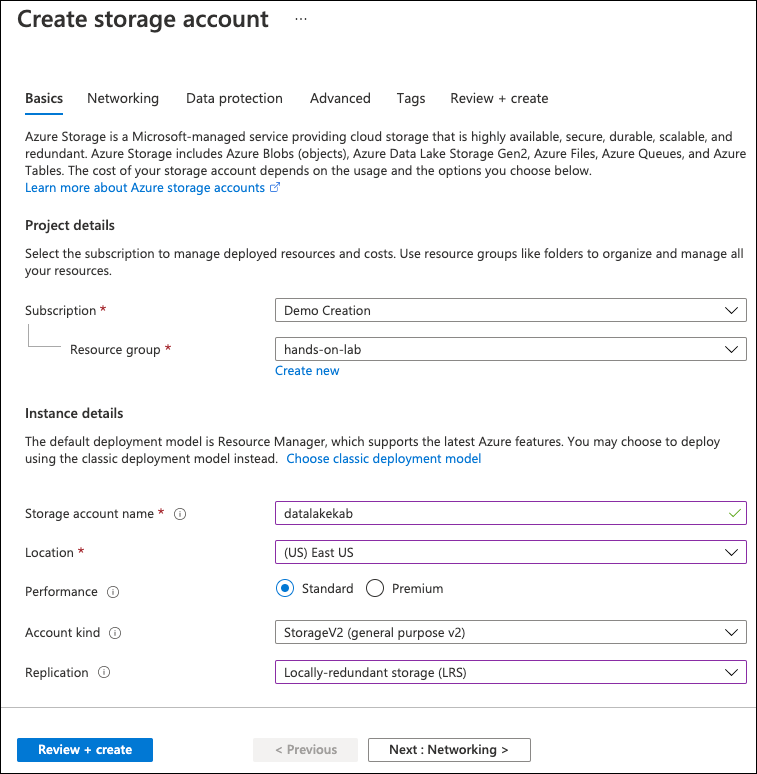
    On the Create storage account blade, the values specified above are entered into the appropriate fields.
    On the Create storage account blade, the values specified above are entered into the appropriate fields.
  4. Next, select the Advanced tab.

    The Advanced tab is highlighted in the tabs on the Create storage account blade.
    The Advanced tab is highlighted in the tabs on the Create storage account blade.
  5. On the Advanced tab, select Enabled from the Hierarchical namespace setting under Data Lake Storage Gen2.
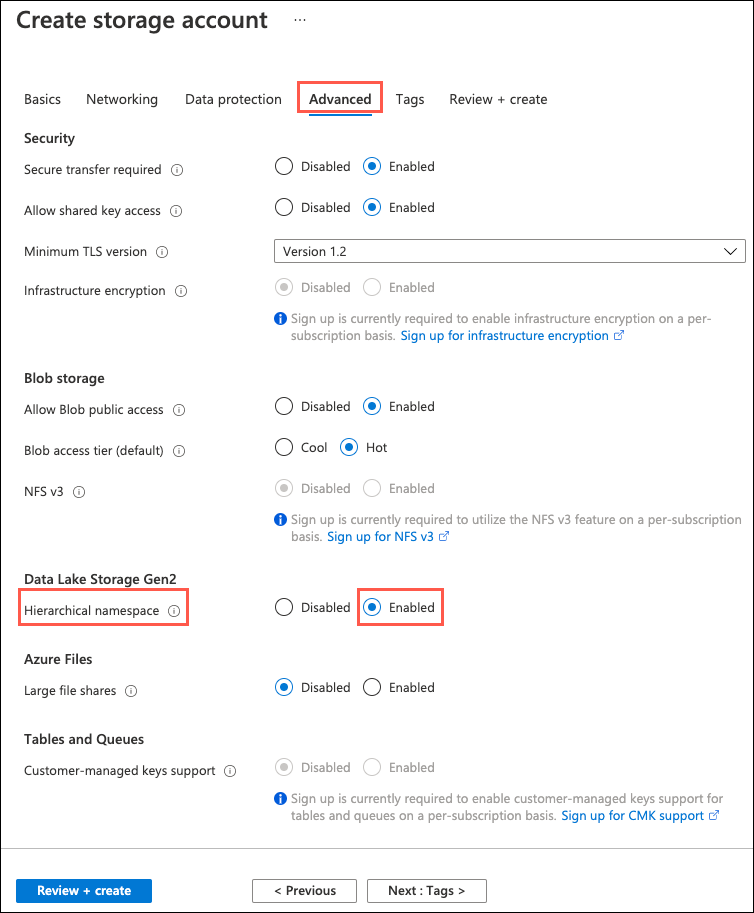
    The Advanced tab of the Create storage account blade is highlighted and Hierarchical namespace and its enabled setting are selected and highlighted.
    The Advanced tab of the Create storage account blade is highlighted and Hierarchical namespace and its enabled setting are selected and highlighted.
  6. Select Review + create.

  7. On the Review + create blade, ensure the Validation passed message is displayed and then select Create.

  8. After the storage account has completed provisioning, open the storage account by selecting Go to resource.
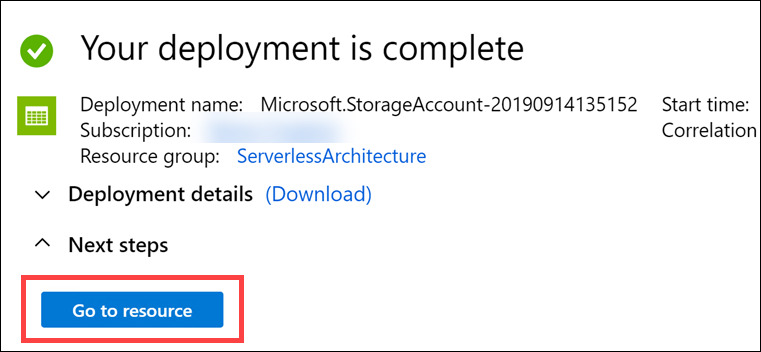
    In the Azure Portal, once the storage account has completed provisioning, a status message is displayed saying Your deployment is complete. Beneath the next steps section, The Go to resource button is highlighted.
    In the Azure Portal, once the storage account has completed provisioning, a status message is displayed saying Your deployment is complete. Beneath the next steps section, The Go to resource button is highlighted.
  9. On the Storage account blade, select Containers under Data Lake Storage in the left-hand navigation menu and then select the + Container button to add a new container.

    The Containers menu item is selected and highlighted in the Storage account blade’s left-hand menu, and + Container is highlighted on the Containers blade.
    The Containers menu item is selected and highlighted in the Storage account blade’s left-hand menu, and + Container is highlighted on the Containers blade.
  10. In the New container dialog, enter images into the Name field, choose Private (no anonymous access) for the public access level, then select Create to save the container.
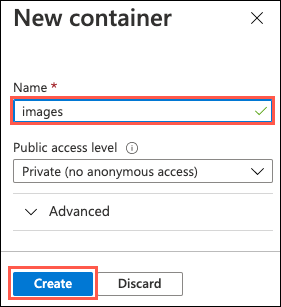
    In the New container dialog, images is entered into the Name field and highlighted. Private (no anonymous access) is selected for the public access level. The Create button is highlighted.
    In the New container dialog, images is entered into the Name field and highlighted. Private (no anonymous access) is selected for the public access level. The Create button is highlighted.
  11. Repeat step 10 to create another container named export.
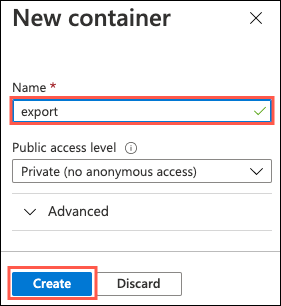
    In the New container dialog, images is entered into the Name field and highlighted. Private (no anonymous access) is selected for the public access level. The Create button is highlighted.
    In the New container dialog, images is entered into the Name field and highlighted. Private (no anonymous access) is selected for the public access level. The Create button is highlighted.
  12. Next, select Access Keys, under Settings in the left-hand navigation menu. Then on the Access keys blade, select Show keys and then select the Click to copy button for the key1 connection string value.

    In the Storage account blade, under Settings, Access keys is selected. Under Default keys, the copy button next to the key1 connection string is selected.
    In the Storage account blade, under Settings, Access keys is selected. Under Default keys, the copy button next to the key1 connection string is selected.
  13. Paste the value into a text editor, such as Notepad, for reference in the Key Vault steps below.

Task 2: Provision the TollBooth Function App

  1. In the Azure portal, select the Show portal menu icon and then select +Create a resource from the menu.

    The Show portal menu icon is highlighted, and the portal menu is displayed. Create a resource is highlighted in the portal menu.
    The Show portal menu icon is highlighted, and the portal menu is displayed. Create a resource is highlighted in the portal menu.
  2. Enter “function app” into the Search the marketplace box and select Function App from the results.
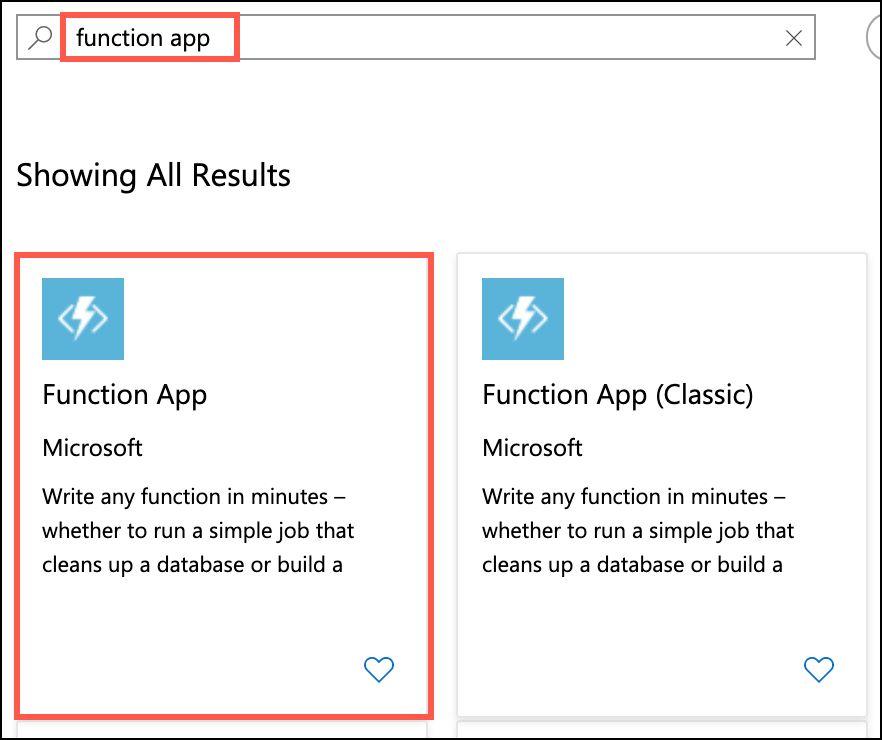
    Function app is highlighted in the search box, and the Function App row is highlighted in the results below that.
    Function app is highlighted in the search box, and the Function App row is highlighted in the results below that.
  3. On the Function App blade, select Create.

  4. On the Create Function App blade, enter the following:

    Project Details:

    Instance Details:
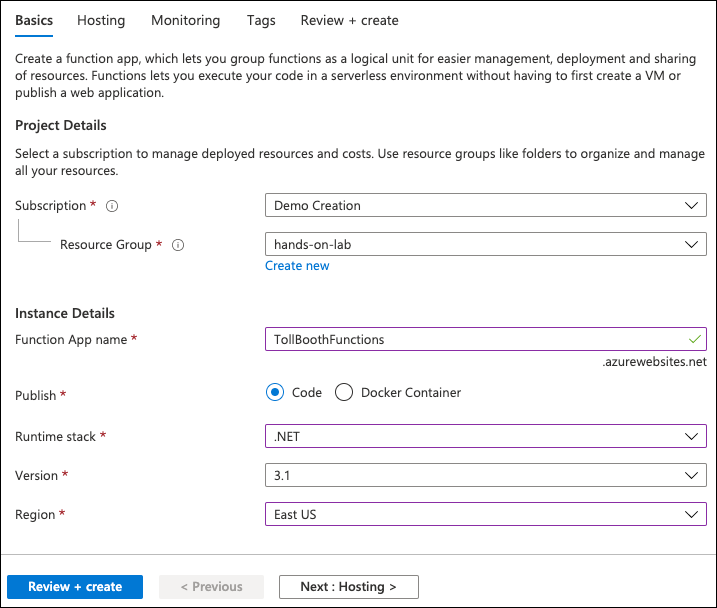
    The information above is entered on the Create Function App basics tab.
    The information above is entered on the Create Function App basics tab.
  5. Select Next: Hosting.

  6. On the Hosting tab, set the following configuration:
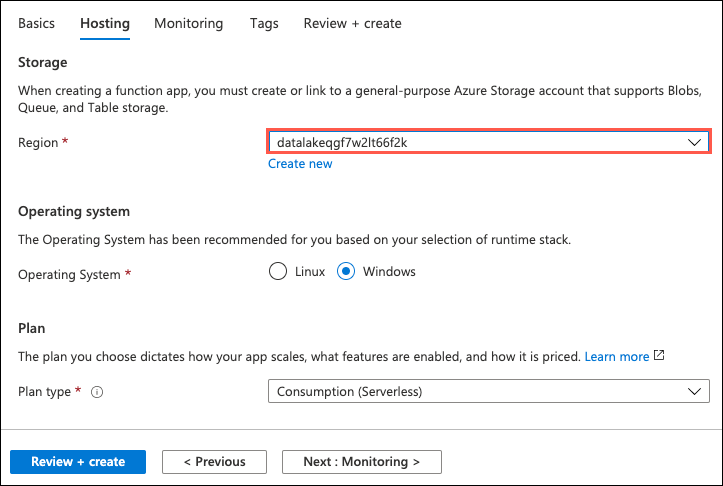
    The information above is entered on the Create Function App hosting tab.
    The information above is entered on the Create Function App hosting tab.
  7. Select Next: Monitoring, and on the Monitoring tab, enter the following:
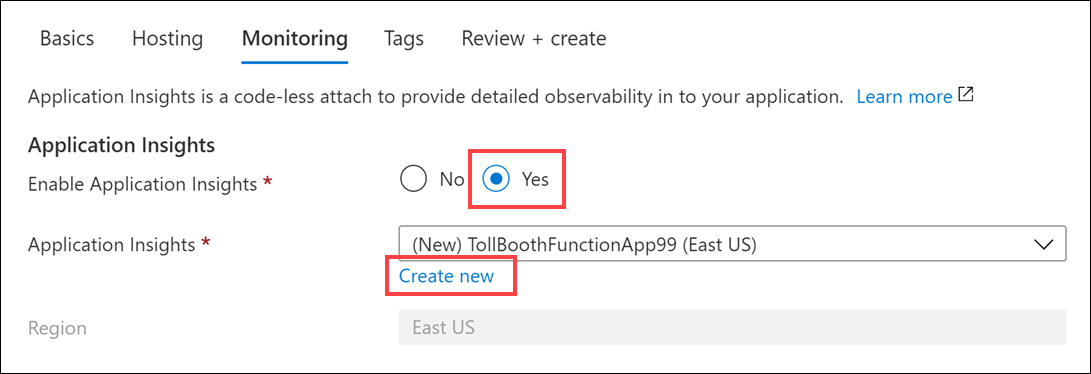
    In the Monitoring tab of the Create Function App blade, the form fields are set to the previously defined values.
    In the Monitoring tab of the Create Function App blade, the form fields are set to the previously defined values.
  8. In the Create new Application Insights dialog, provide the following information, then select OK:
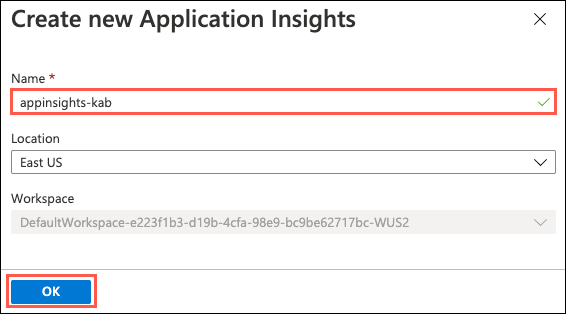
    The new Application Insights form is configured as described.
    The new Application Insights form is configured as described.
  9. Select Review + create.

    The Review + create button is highlighted in the button bar.
    The Review + create button is highlighted in the button bar.
  10. Select Create to provision the new Function App.

  11. When the function app provisioning completes, navigate to it in the Azure portal by opening the hands-on-lab-SUFFIX resource group and then select the Azure Function App resource whose name begins with TollBoothFunctions.

    For your Function App to be able to access Key Vault to read the secrets, you must create a system-assigned managed identity for the Function App, and create an access policy in Key Vault for the application identity.
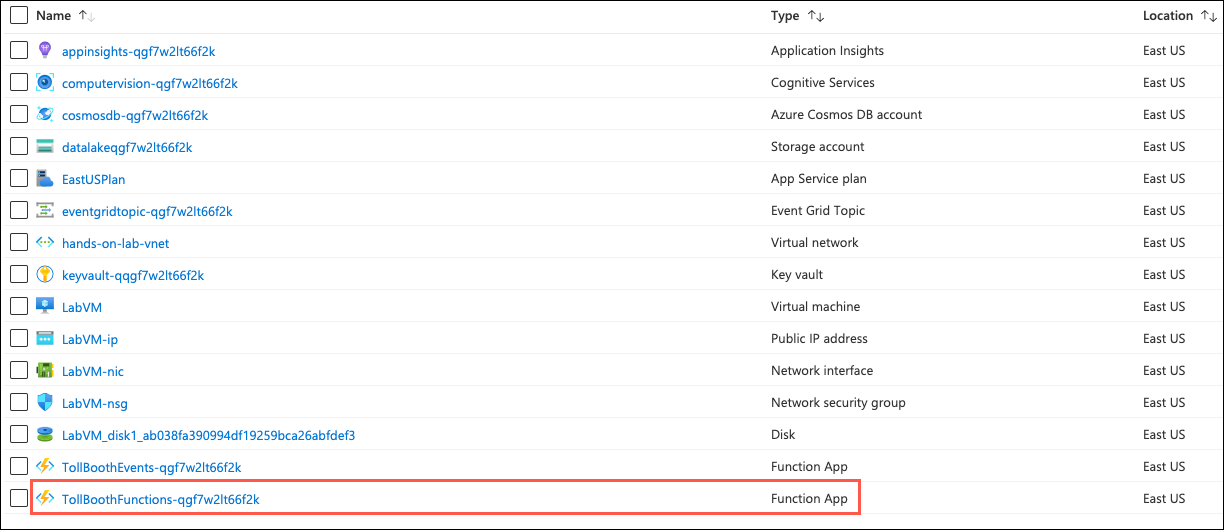
    In the hands-on-lab-SUFFIX resource group, the TollBoothFunctions Function App is highlighted.
    In the hands-on-lab-SUFFIX resource group, the TollBoothFunctions Function App is highlighted.
  12. On the Function App blade, select Identity in the left-hand navigation menu, and within the System assigned tab, switch Status to On and select Save.
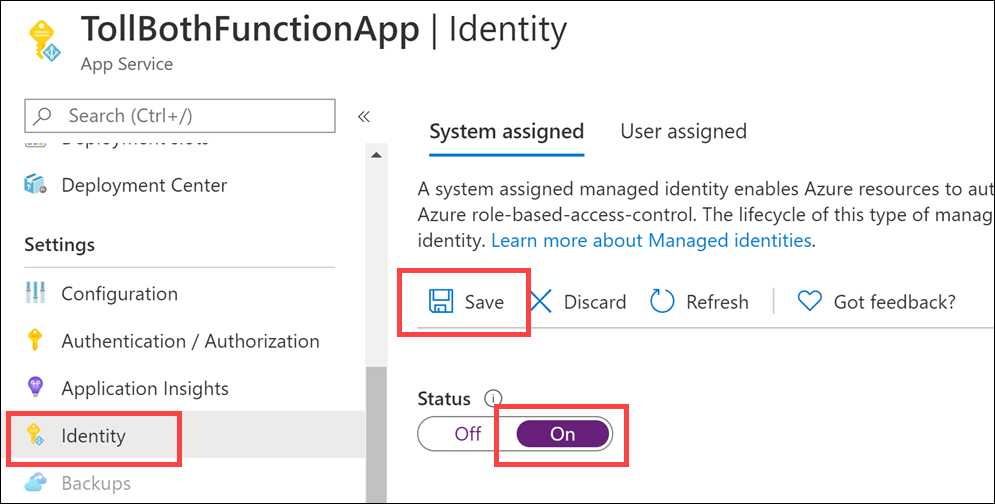
    In the Identity blade, the System assigned tab is selected with the Status set to On, and the Save button is highlighted.
    In the Identity blade, the System assigned tab is selected with the Status set to On, and the Save button is highlighted.

Task 3: Provision the Events Function App

  1. In the Azure portal, select the Show portal menu icon and then select +Create a resource from the menu.

    The Show portal menu icon is highlighted, and the portal menu is displayed. Create a resource is highlighted in the portal menu.
    The Show portal menu icon is highlighted, and the portal menu is displayed. Create a resource is highlighted in the portal menu.
  2. Enter “function app” into the Search the marketplace box and select Function App from the results.

    Function app is highlighted in the search box, and the Function App row is highlighted in the results below that.
    Function app is highlighted in the search box, and the Function App row is highlighted in the results below that.
  3. On the Function App blade, select Create.

  4. On the Create Function App blade, enter the following:

    Project Details:

    Instance Details:
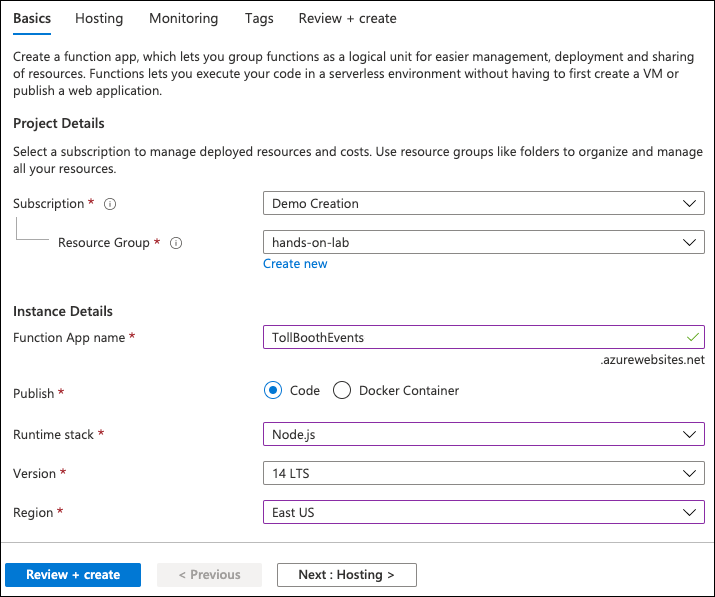
    The information above is entered on the Create Function App basics tab.
    The information above is entered on the Create Function App basics tab.
  5. Select Next: Hosting.

  6. On the Hosting tab, set the following configuration:

    The information above is entered on the Create Function App hosting tab.
    The information above is entered on the Create Function App hosting tab.
  7. Select Next: Monitoring, and on the Monitoring tab, enter the following:
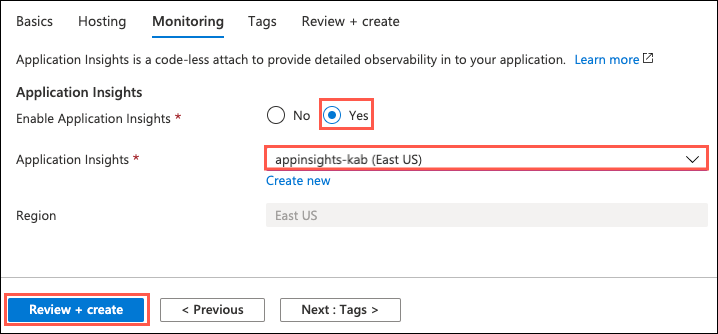
    In the Monitoring tab of the Create Function App blade, the form fields are set to the previously defined values.
    In the Monitoring tab of the Create Function App blade, the form fields are set to the previously defined values.
  8. Select Review + create and then select Create to provision the Function App.

Task 4: Provision an Event Grid topic

  1. In the Azure portal, select the Show portal menu icon and then select +Create a resource from the menu.

    The Show portal menu icon is highlighted, and the portal menu is displayed. Create a resource is highlighted in the portal menu.
    The Show portal menu icon is highlighted, and the portal menu is displayed. Create a resource is highlighted in the portal menu.
  2. Enter “event grid topic” into the Search the marketplace box and select Event Grid Topic from the results.
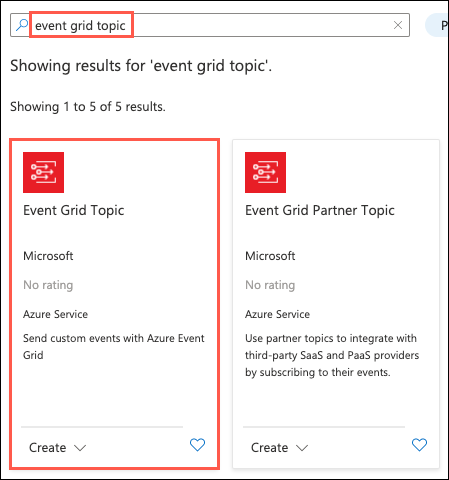
    Event Grid Topic is highlighted in the search box, and the Event Grid Topic panel is highlighted in the results below that.
    Event Grid Topic is highlighted in the search box, and the Event Grid Topic panel is highlighted in the results below that.
  3. On the Event Grid Topic blade, select Create.

  4. On the Create Topic blade, specify the following configuration options:

    Project Details:

    Instance Details:
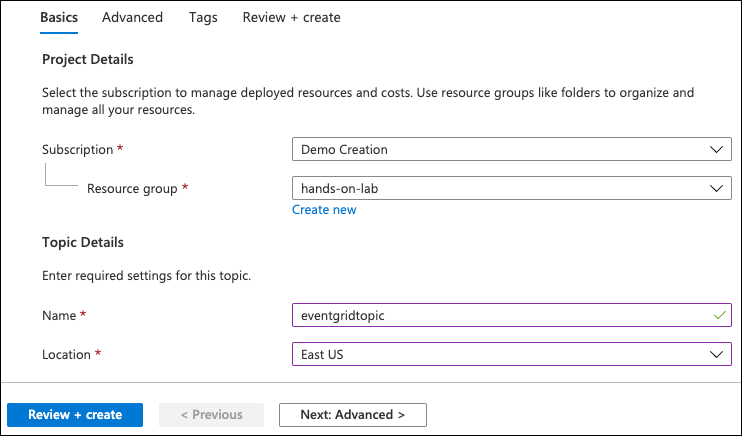
    In the Create Topic blade, the Name field is set to eventgridtopic, and the Resource Group selected is hands-on-lab-SUFFIX.
    In the Create Topic blade, the Name field is set to eventgridtopic, and the Resource Group selected is hands-on-lab-SUFFIX.
  5. Select Review + Create, then select Create in the screen that follows.

  6. After the Event Grid topic has completed provisioning, open the account by opening the hands-on-lab-SUFFIX resource group and then selecting the Event Grid Topic resource from the list of available services.

  7. On the Event Grid Topic blade, select Overview in the left-hand navigation menu and then copy the Topic Endpoint value and paste the value into a text editor, such as Notepad, for later reference.

    On the Event Grid Topic blade, Overview is selected and highlighted, and the Topic Endpoint value is highlighted.
    On the Event Grid Topic blade, Overview is selected and highlighted, and the Topic Endpoint value is highlighted.
  8. Next, select Access Keys under Settings in the left-hand navigation menu on the Event Grid Topic blade.

  9. Within the Access Keys blade, copy the Key 1 value and paste it into a text editor, such as Notepad, for later reference.
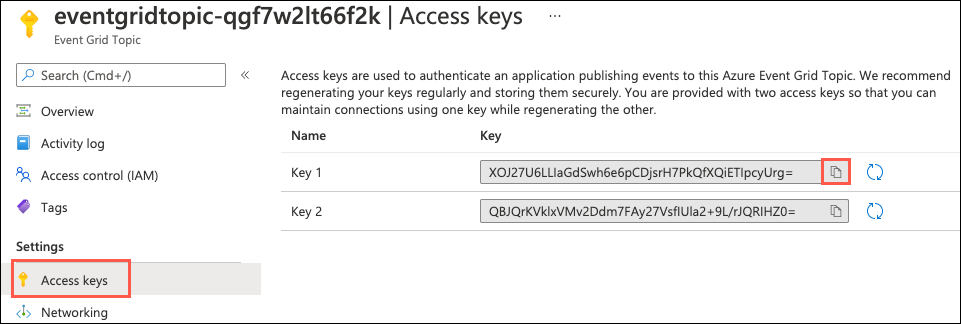
    In the eventgridtopic blade, in the left menu under Settings, Access keys is selected. In the listing of Access keys, the copy button next to the Key 1 access key is selected.
    In the eventgridtopic blade, in the left menu under Settings, Access keys is selected. In the listing of Access keys, the copy button next to the Key 1 access key is selected.

Task 5: Provision and configure an Azure Cosmos DB account

  1. In the Azure portal, select the Show portal menu icon and then select +Create a resource from the menu.

    The Show portal menu icon is highlighted, and the portal menu is displayed. Create a resource is highlighted in the portal menu.
    The Show portal menu icon is highlighted, and the portal menu is displayed. Create a resource is highlighted in the portal menu.
  2. On the New screen, select Databases then select Azure Cosmos DB.
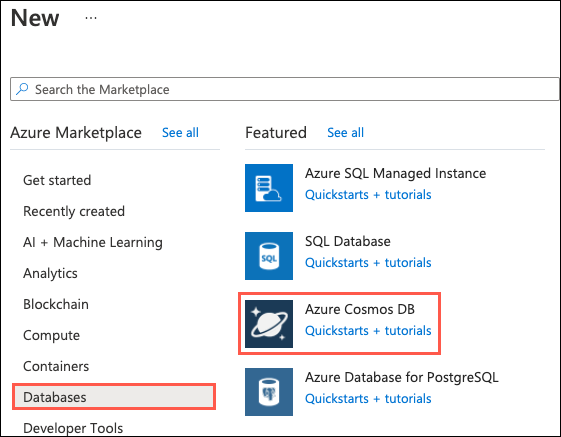
    In Azure Portal, in the menu, New is selected. Under Azure marketplace, Databases is selected, and under Featured, Azure Cosmos DB is selected.
    In Azure Portal, in the menu, New is selected. Under Azure marketplace, Databases is selected, and under Featured, Azure Cosmos DB is selected.
  3. On the Create new Azure Cosmos DB account blade, specify the following configuration options:

    Project Details:

    Instance Details:
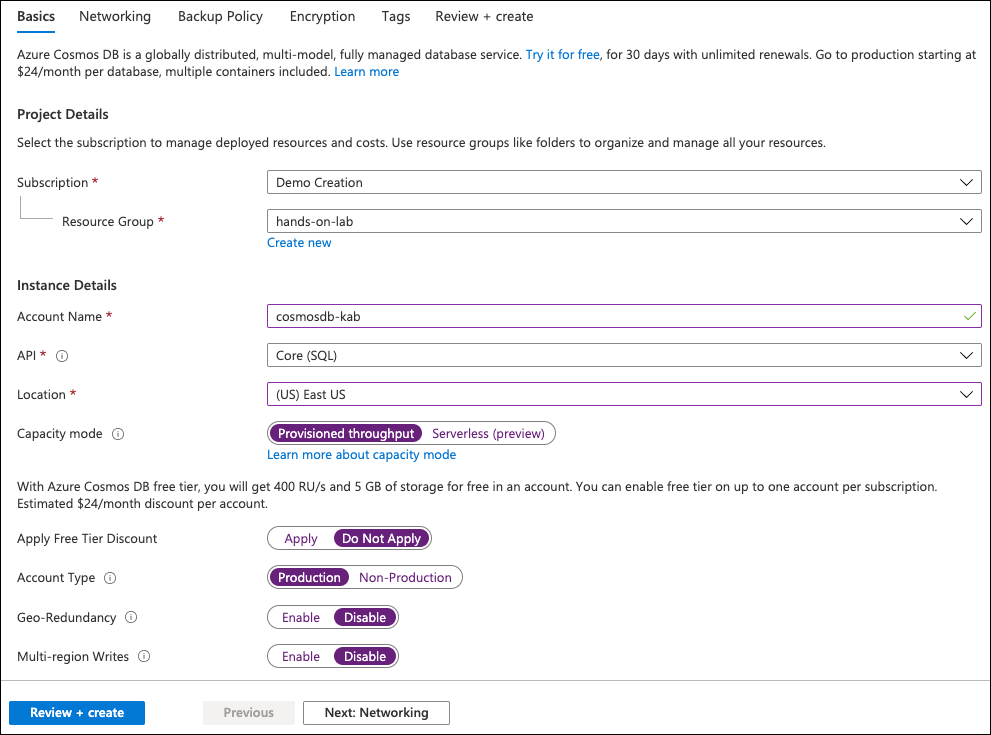
    Fields in the Azure Cosmos DB blade are set to the previously defined settings.
    Fields in the Azure Cosmos DB blade are set to the previously defined settings.
  4. Select Review + create, then select Create.

  5. After the Azure Cosmos DB account has completed provisioning, open the account by opening the hands-on-lab-SUFFIX resource group and then selecting the Azure Cosmos DB resource from the list of available services in the resource group.

  6. On the Cosmos DB blade, select Data Explorer in the left-hand navigation menu and then select New Container.
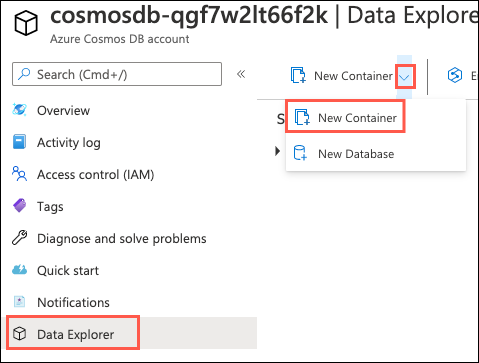
    In the Data Explorer blade, the Data Explorer item is selected in the left menu. The New Container button is selected in the Data Explorer pane.
    In the Data Explorer blade, the Data Explorer item is selected in the left menu. The New Container button is selected in the Data Explorer pane.
  7. On the Add Container blade, specify the following configuration options:
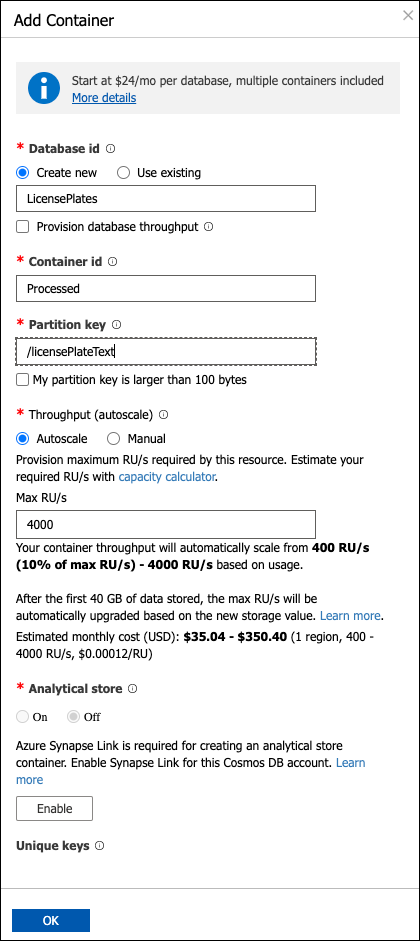
    In the Add Container blade, fields are set to the previously defined values.
    In the Add Container blade, fields are set to the previously defined values.
  8. Select OK.

  9. Select New Container again on the Data Explorer blade to add another container.

  10. On the Add Container blade, specify the following configuration options:
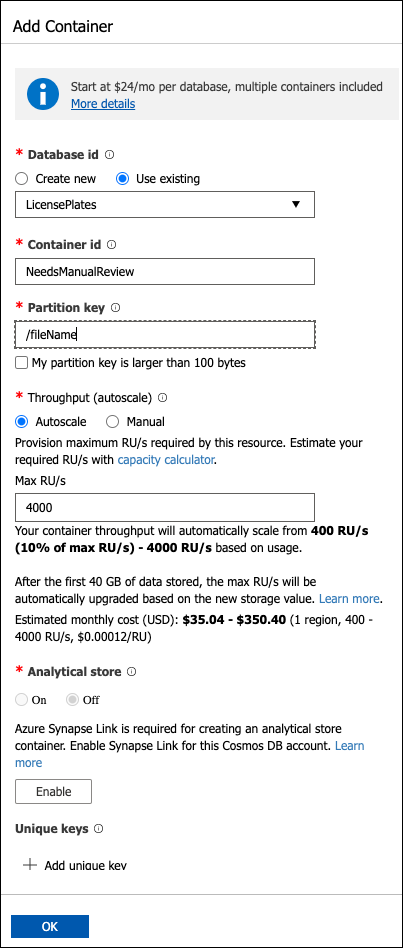
    In the Add Container blade, fields are set to the previously defined values.
    In the Add Container blade, fields are set to the previously defined values.
  11. Select OK.

  12. Select Keys under Settings in the left-hand navigation menu on the Cosmos DB blade.

  13. Underneath the Read-write Keys tab within the Keys blade, copy the URI and Primary Key values.

    In the tollbooth - Keys blade, under Settings, Keys is selected. The copy buttons for the URI and Primary Key fields are selected on the Read-write Keys tab.
    In the tollbooth - Keys blade, under Settings, Keys is selected. The copy buttons for the URI and Primary Key fields are selected on the Read-write Keys tab.
  14. Paste the values into a text editor, such as Notepad, for later reference.

Task 6: Provision the Computer Vision API service

  1. In the Azure portal, select the Show portal menu icon and then select +Create a resource from the menu.

    The Show portal menu icon is highlighted, and the portal menu is displayed. Create a resource is highlighted in the portal menu.
    The Show portal menu icon is highlighted, and the portal menu is displayed. Create a resource is highlighted in the portal menu.
  2. Enter “computer vision” into the Search the marketplace box, select Computer Vision from the results, and then select the Create button on the Computer Vision blade.

  3. On the Create Computer Vision blade, specify the following configuration options:

    Project Details:

    Instance Details:
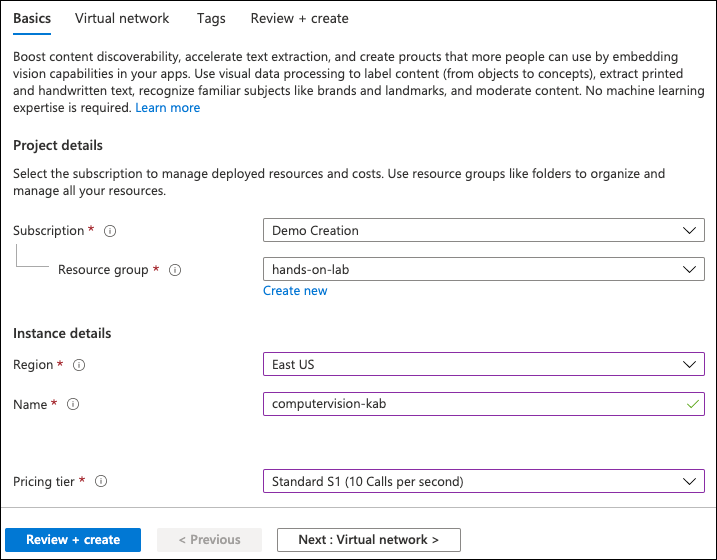
    In the Create Computer Vision blade, fields are set to the previously defined values.
    In the Create Computer Vision blade, fields are set to the previously defined values.
  4. Select Review + create and then select Create.

  5. After the Computer Vision service has completed provisioning, open the service by opening the hands-on-lab-SUFFIX resource group and then selecting the Computer Vision Cognitive Service resource from the list of available services in the resource group.

  6. Under Resource Management in the left-hand navigation menu, select Keys and Endpoint.

  7. Within the Keys and Endpoint blade, copy the Endpoint and KEY 1 values.
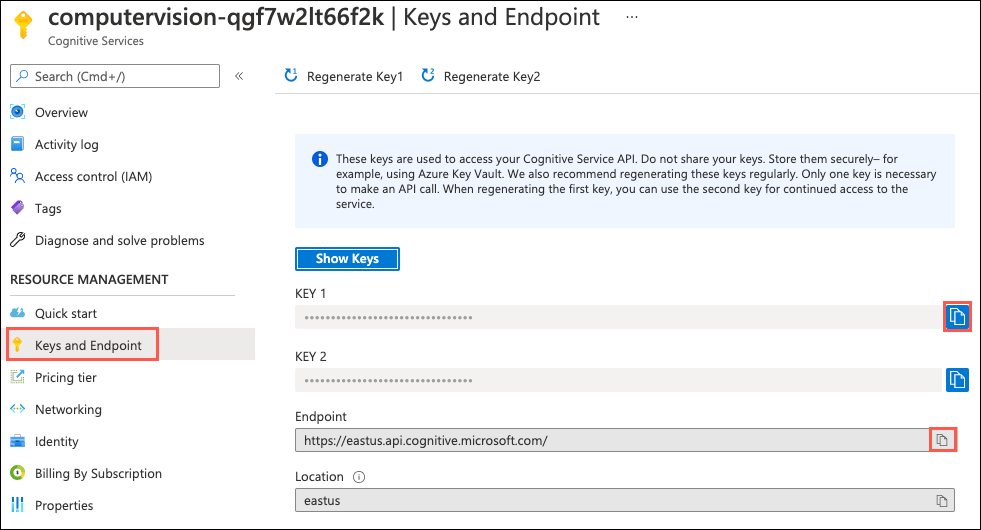
    In the Cognitive Services blade, under Resource Management, Keys and Endpoint is selected. The Copy button next to the Endpoint and Key 1 values are selected.
    In the Cognitive Services blade, under Resource Management, Keys and Endpoint is selected. The Copy button next to the Endpoint and Key 1 values are selected.
  8. Paste the values into a text editor, such as Notepad, for later reference.

Task 7: Create a Logic App

  1. In the Azure portal, select the Show portal menu icon and then select +Create a resource from the menu.

    The Show portal menu icon is highlighted, and the portal menu is displayed. Create a resource is highlighted in the portal menu.
    The Show portal menu icon is highlighted, and the portal menu is displayed. Create a resource is highlighted in the portal menu.
  2. Enter “logic app” into the Search the marketplace box and select Logic App from the results.
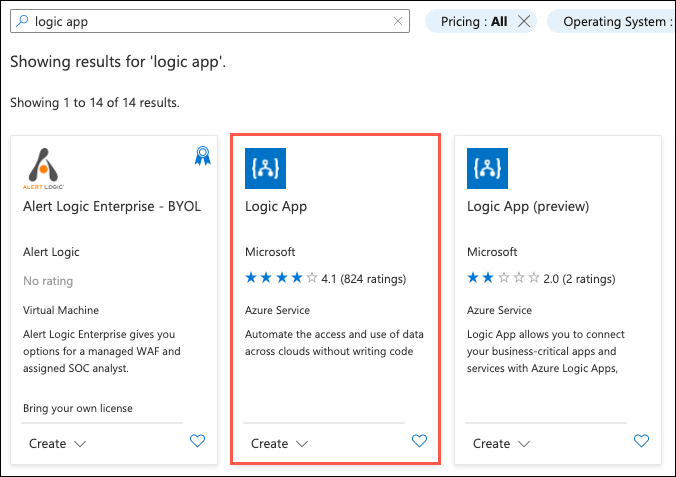
    Logic app is entered into the search the marketplace box and highlighted. The Logic App pane is highlighted in the search results.
    Logic app is entered into the search the marketplace box and highlighted. The Logic App pane is highlighted in the search results.
  3. Select the Create button on the Logic App blade.

  4. On the Create a logic app blade Basics tab, specify the following configuration options:

    Project Details:

    Instance Details:
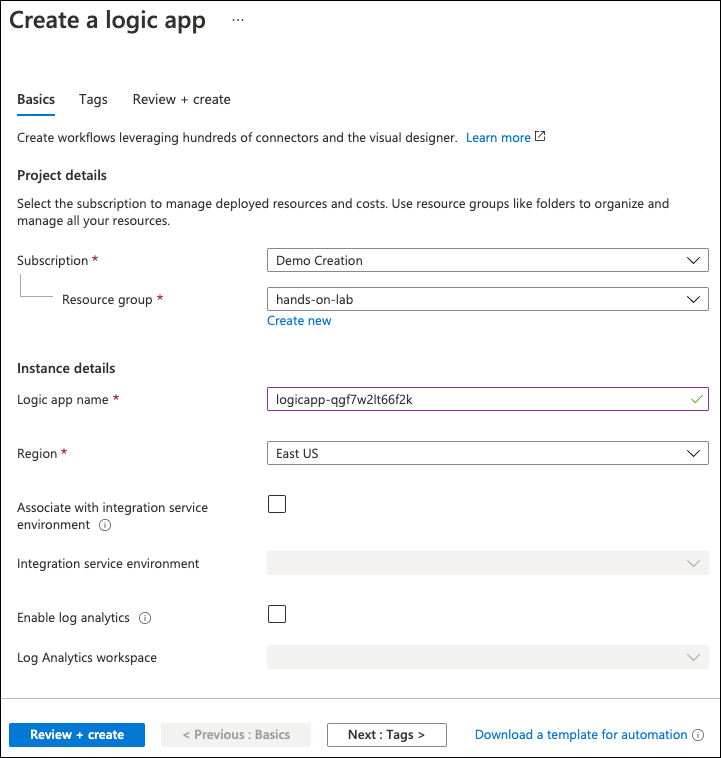
    The values specified above are entered into the create a logic app basics tab.
    The values specified above are entered into the create a logic app basics tab.
  5. Select Review + create, then select Create.

Task 8: Provision Azure Key Vault

  1. In the Azure portal, select the Show portal menu icon and then select +Create a resource from the menu.

    The Show portal menu icon is highlighted, and the portal menu is displayed. Create a resource is highlighted in the portal menu.
    The Show portal menu icon is highlighted, and the portal menu is displayed. Create a resource is highlighted in the portal menu.
  2. Enter “key vault” into the Search the marketplace box and select Key Vault from the results.
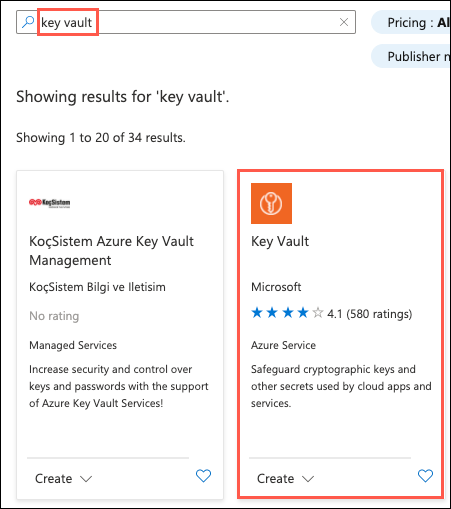
    Key vault is entered into the search the marketplace box and highlighted. The Key Vault pane is highlighted in the search results.
    Key vault is entered into the search the marketplace box and highlighted. The Key Vault pane is highlighted in the search results.
  3. Select the Create button on the Key Vault blade.

  4. On the Create key vault blade Basics tab, specify the following configuration options:

    Project Details:

    Instance Details:
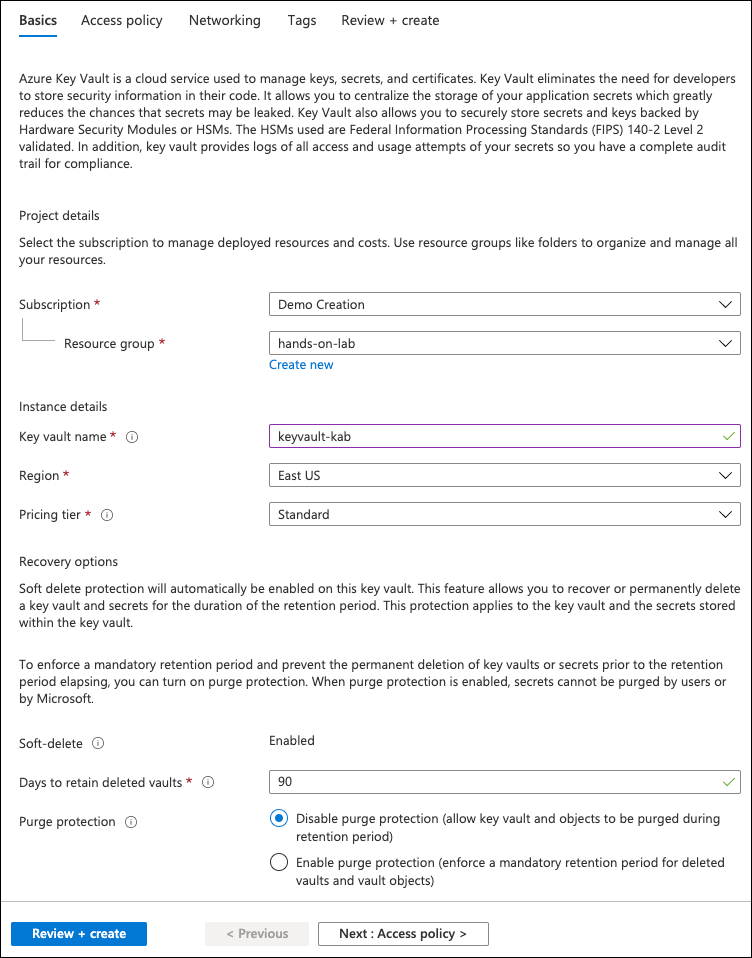
    In the Create key vault blade, fields are set to the previously defined values.
    In the Create key vault blade, fields are set to the previously defined values.
  5. Select Next: Access policy.

  6. On the Access policy tab, select Add Access Policy.
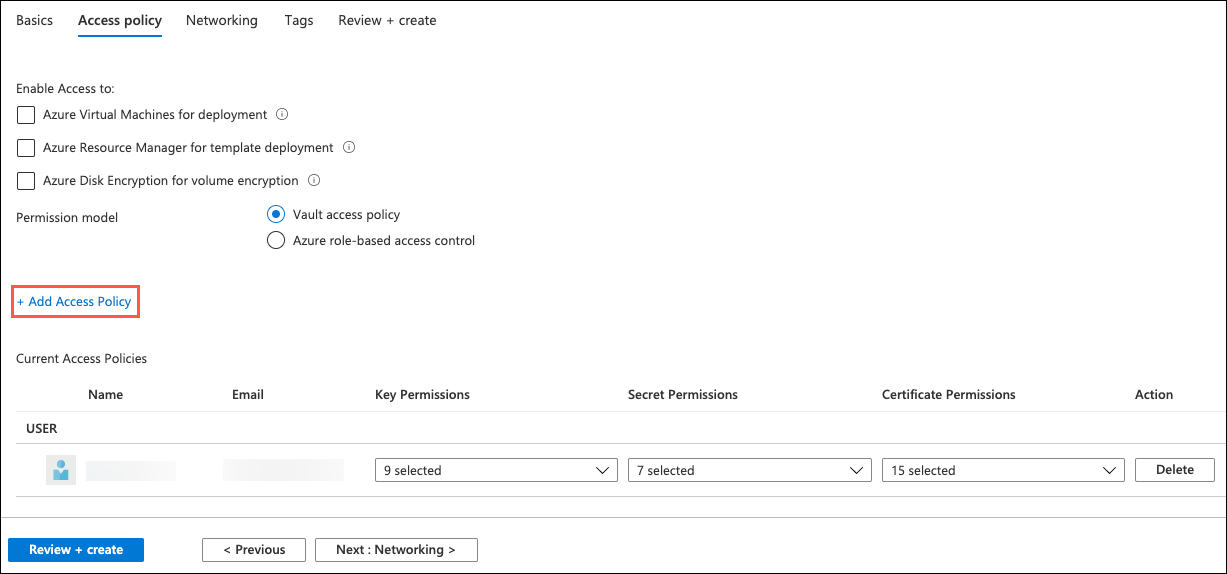
    The Add Access Policy link is highlighted on the Access Policy tab.
    The Add Access Policy link is highlighted on the Access Policy tab.
  7. On the Add access policy dialog, enter the following:
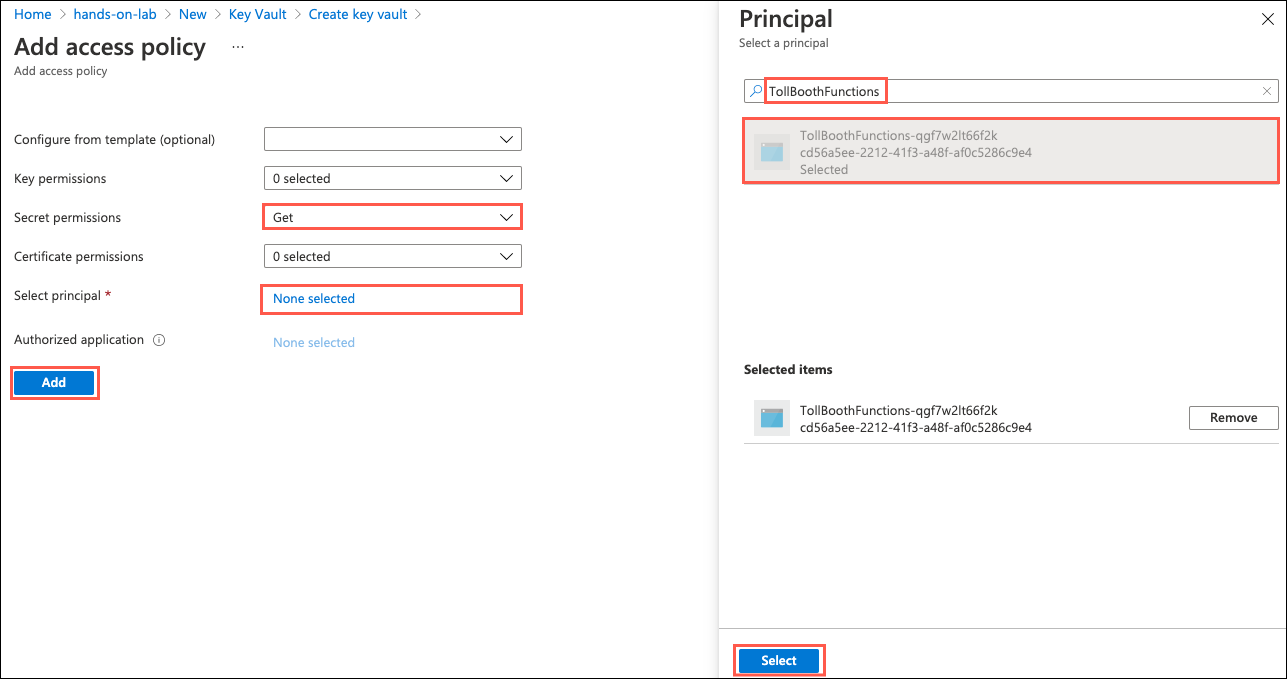
    In the Add access policy form, the Select principal field is highlighted.
    In the Add access policy form, the Select principal field is highlighted.
  8. Select Add to add the new access policy.

  9. Select Review + create, then select Create.

  10. After the deployment completes, select Go to resource in the deployment complete notification.
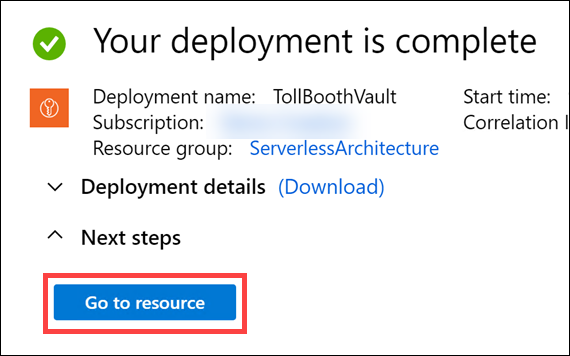
    When the deployment completes, a message is displayed indicating Your deployment is complete. The Go to resource button is highlighted in the next steps section.
    When the deployment completes, a message is displayed indicating Your deployment is complete. The Go to resource button is highlighted in the next steps section.
  11. Select Secrets under Settings in the left-hand navigation menu.

  12. Select Generate/Import to add a new key.
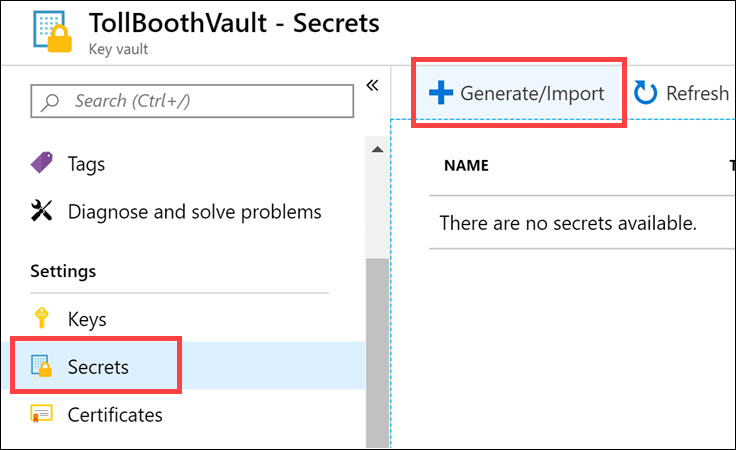
    The Secrets menu item and the Generate/Import button are highlighted.
    The Secrets menu item and the Generate/Import button are highlighted.
  13. Using the key values you copied into a text editor, such as Notepad, in the tasks above, use the table below for the name-value pairs to use when creating the secrets. You only need to populate the Name and Value fields for each secret and leave the other fields at their default values.

    Name Value
    computerVisionApiKey Computer Vision API key
    cosmosDBAuthorizationKey Cosmos DB Primary Key
    dataLakeConnectionString Data Lake storage connection string
    eventGridTopicKey Event Grid Topic access key
  14. When you are finished creating the secrets, your list should look similar to the following:

    The listing of secrets is displayed matching the previously defined values.
    The listing of secrets is displayed matching the previously defined values.

Task 9: Retrieve the URI for each secret

  1. Open your Key Vault instance in the portal.

  2. Still on the Secrets page in Key Vault, select the computerVisionApiKey secret.

    The computerVisionApiKey secret is highlighted in the secrets list.
    The computerVisionApiKey secret is highlighted in the secrets list.
  3. On the computerVisionApiKey blade, select the Current Version of the secret.
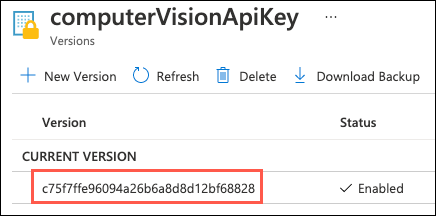
    The secret’s current version is selected.
    The secret’s current version is selected.
  4. On the secret version blade, copy the Secret Identifier value by selecting the Copy to clipboard button.
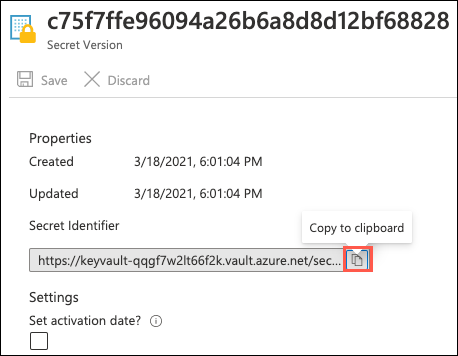
    The Secret Identifier field is highlighted. Next to this field is a copy button.
    The Secret Identifier field is highlighted. Next to this field is a copy button.
  5. Paste the secret identifier value into a text editor, such as Notepad, for later reference.

  6. Close the computerVisionApiKey blades and return to the Secrets page of your Key Vault.

  7. Repeat steps 2 through 6 above for the other three secrets listed.

  8. When you are done copying and pasting the secret identifier values, you should have a list similar to the following in your text editor document:

    @Microsoft.KeyVault(SecretUri=https://tollboothvault.vault.azure.net/secrets/computerVisionApiKey/ce228a43f40140dd8a9ffb9a25d042ee)
    @Microsoft.KeyVault(SecretUri=https://tollboothvault.vault.azure.net/secrets/cosmosDBAuthorizationKey/1f9a0d16ad22409b85970b3c794a218c)
    @Microsoft.KeyVault(SecretUri=https://tollboothvault.vault.azure.net/secrets/dataLakeConnectionString/771aa40adac64af0b2aefbd741bd46ef)
    @Microsoft.KeyVault(SecretUri=https://tollboothvault.vault.azure.net/secrets/eventGridTopicKey/e310bcd71a72489f89b6112234fed815)

Task 10: Configure application settings for the TollBoothFunctions Function App

  1. Navigate to the TollBoothFunctions Function App resource in the Azure portal by opening the hands-on-lab-SUFFIX resource group and then select the Azure Function App resource whose name begins with TollBoothFunctions.

    In the hands-on-lab-SUFFIX resource group, the TollBoothFunctions Function App is highlighted.
    In the hands-on-lab-SUFFIX resource group, the TollBoothFunctions Function App is highlighted.
  2. On the Function App blade, select Configuration in the left-hand navigation menu.
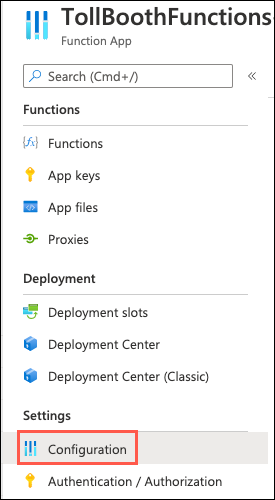
    In the TollBoothFunctionApp blade on the Overview tab, under Configured features, the Configuration item is selected.
    In the TollBoothFunctionApp blade on the Overview tab, under Configured features, the Configuration item is selected.
  3. Scroll to the Application settings section. Use the + New application setting link to create the following additional key-value pairs (the key names must exactly match those found in the table below). Be sure to remove the curly braces ({}).

    Application Key Value
    computerVisionApiKey Enter @Microsoft.KeyVault(SecretUri={referenceString}), where {referenceString} is the URI for the computerVisionApiKey Key Vault secret
    computerVisionApiUrl Computer Vision API endpoint you copied earlier with vision/v3.0/ocr appended to the end. Example: https://eastus.api.cognitive.microsoft.com/vision/v3.0/ocr
    cosmosDBAuthorizationKey Enter @Microsoft.KeyVault(SecretUri={referenceString}), where {referenceString} is the URI for the cosmosDBAuthorizationKey Key Vault secret
    cosmosDBCollectionId Cosmos DB processed collection id (Processed)
    cosmosDBDatabaseId Cosmos DB database id (LicensePlates)
    cosmosDBEndpointUrl Cosmos DB URI
    dataLakeConnection Enter @Microsoft.KeyVault(SecretUri={referenceString}), where {referenceString} is the URI for the dataLakeConnectionString Key Vault secret
    eventGridTopicEndpoint Event Grid Topic endpoint
    eventGridTopicKey Enter @Microsoft.KeyVault(SecretUri={referenceString}), where {referenceString} is the URI for the eventGridTopicKey Key Vault secret
    exportCsvContainerName Data lake CSV export container name (export)
    In the Application Settings section, the previously defined key/value pairs are displayed.
    In the Application Settings section, the previously defined key/value pairs are displayed.
  4. Select Save on the Configuration toolbar to save the application settings changes.

Task 11: Set up a development virtual machine

In this task, you provision a virtual machine (VM) in Azure. The VM image used has the latest version of Visual Studio Community 2019 installed.

  1. In the Azure portal, select the Show portal menu icon and then select +Create a resource from the menu.

    The Show portal menu icon is highlighted, and the portal menu is displayed. Create a resource is highlighted in the portal menu.
    The Show portal menu icon is highlighted, and the portal menu is displayed. Create a resource is highlighted in the portal menu.
  2. Enter “visual studio 2019” into the Search the Marketplace box and then select Visual Studio 2019 Latest from the results.
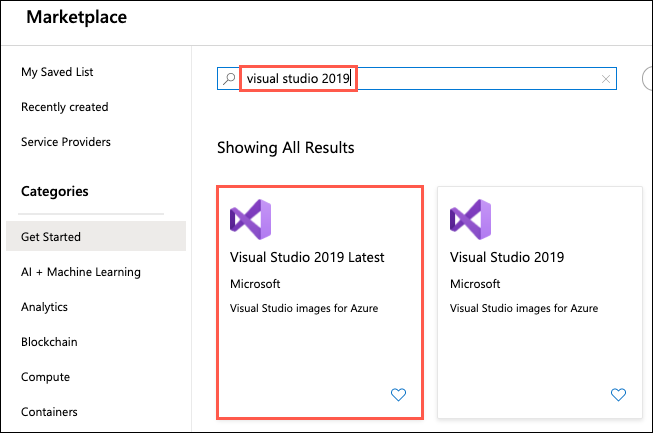
    “Visual studio 2019” is entered into the Search the Marketplace box. Visual Studio 2019 latest is selected in the results.
    “Visual studio 2019” is entered into the Search the Marketplace box. Visual Studio 2019 latest is selected in the results.
  3. On the Visual Studio 2019 Latest blade, select Visual Studio 2019 Community (latest release) on Windows Server 2019 (x64) from the Select a software plan drop-down list, and then select Create.

    On the Visual Studio 2019 Latest blade, Visual Studio 2019 Community (latest release) on Windows Server 2019 (x64) is highlighted in the Select a software plan drop-down list.
    On the Visual Studio 2019 Latest blade, Visual Studio 2019 Community (latest release) on Windows Server 2019 (x64) is highlighted in the Select a software plan drop-down list.
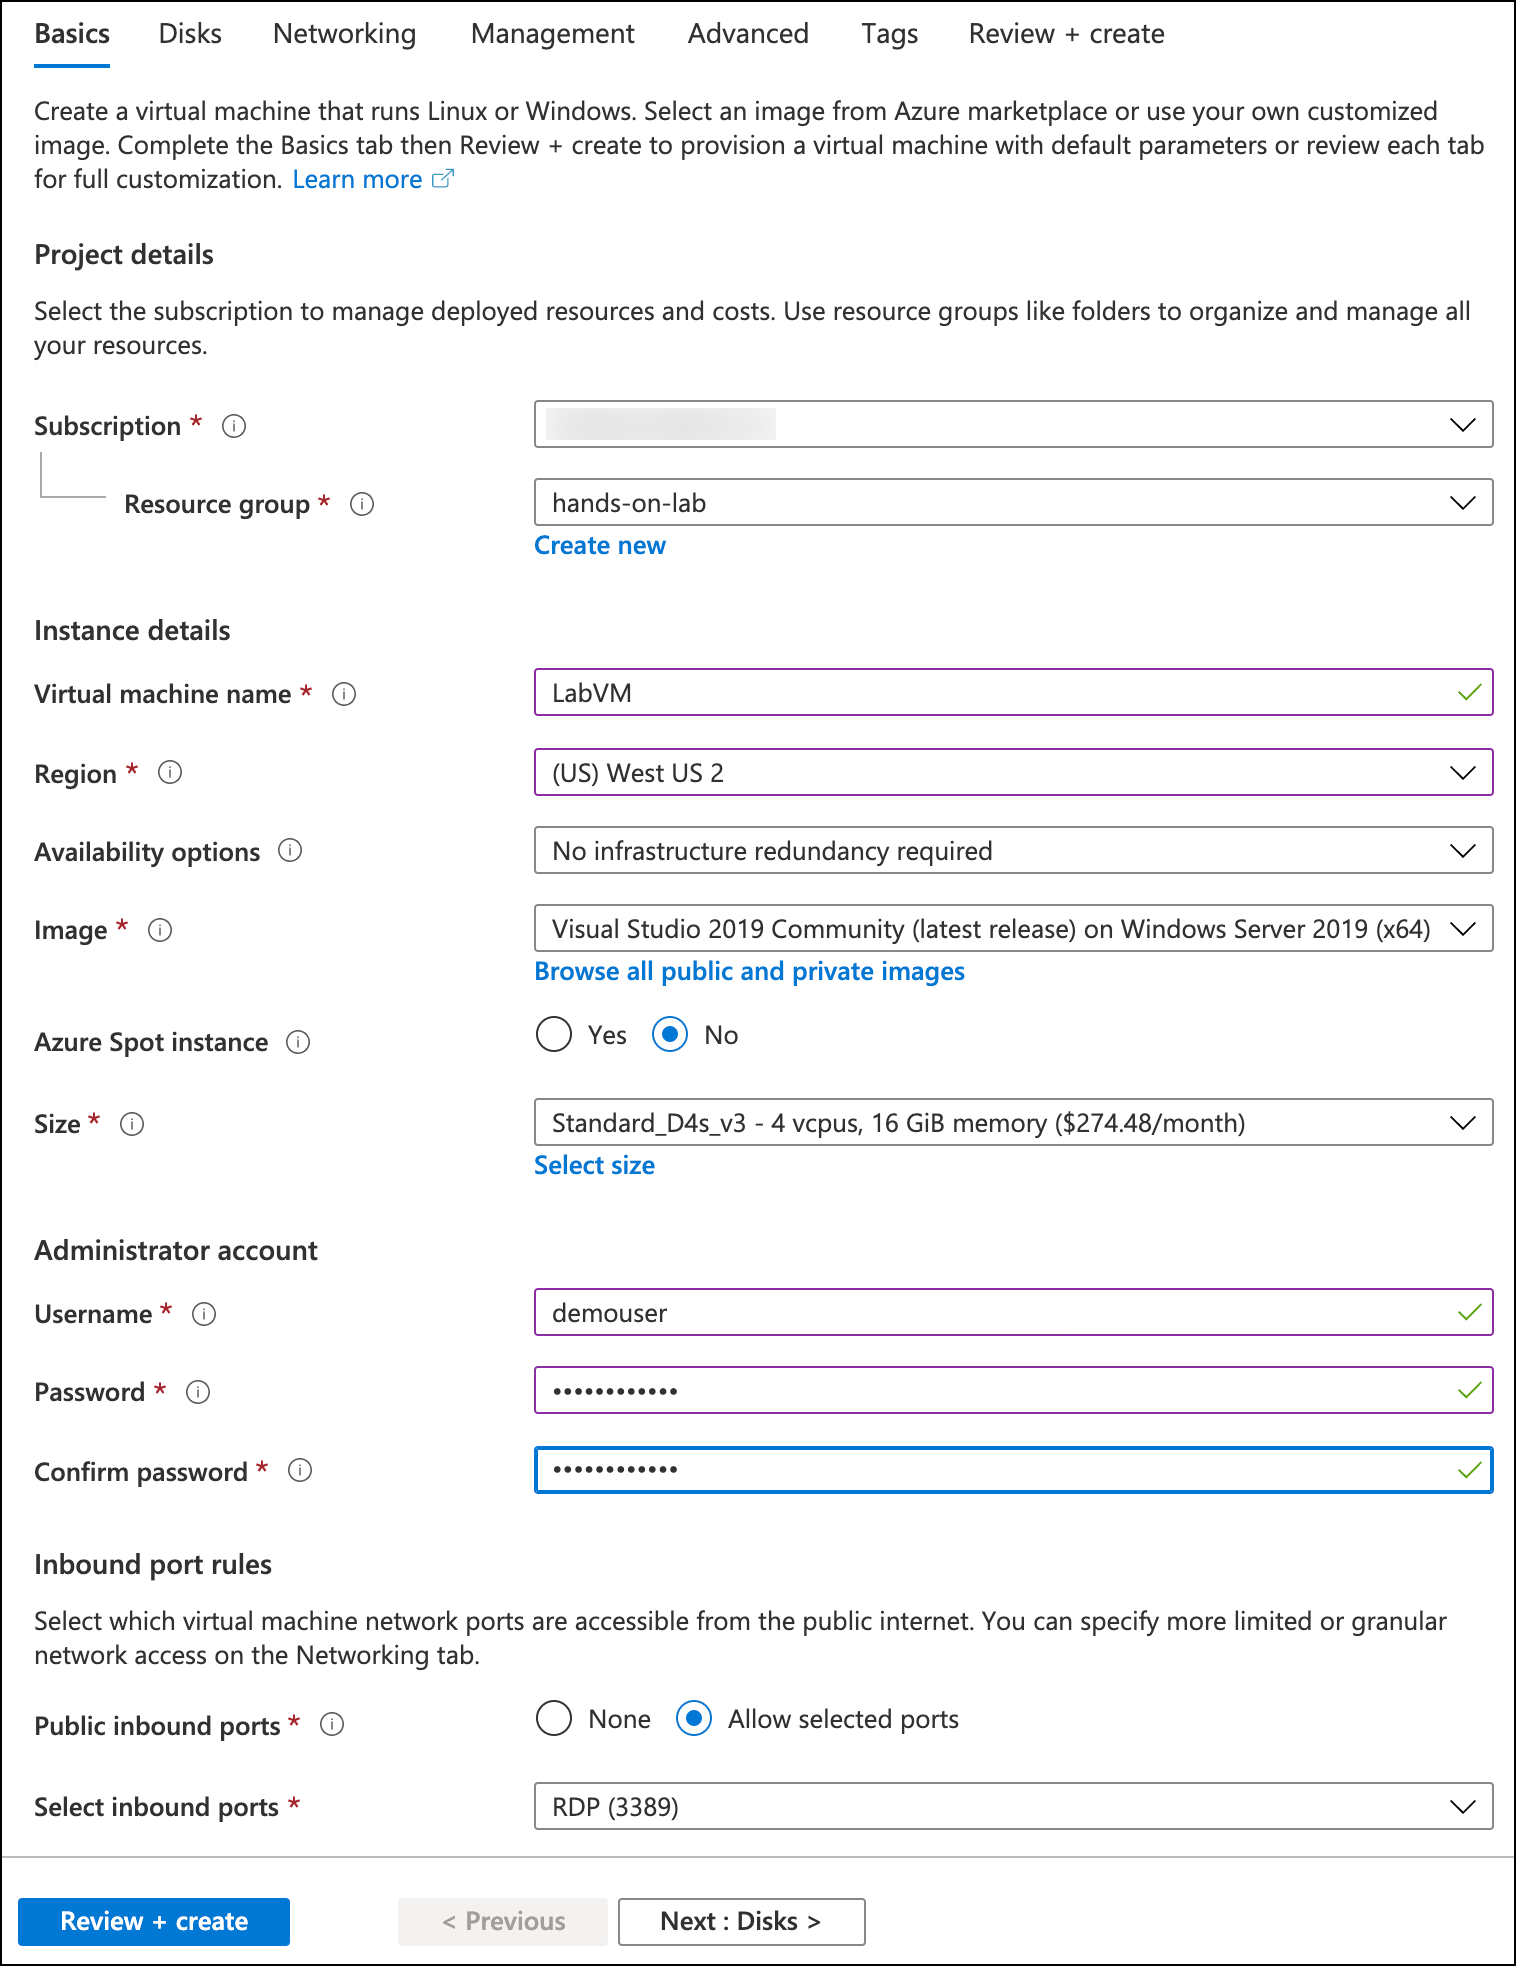
  4. On the Create a virtual machine Basics tab, set the following configuration:

    Screenshot of the Basics tab, with fields set to the previously mentioned settings.
    Screenshot of the Basics tab, with fields set to the previously mentioned settings.

    Note: Default settings are used for the remaining tabs so that they can be skipped.

  5. Select Review + create to validate the configuration.

  6. On the Review + create tab, ensure the Validation passed message is displayed, and then select Create to provision the virtual machine.
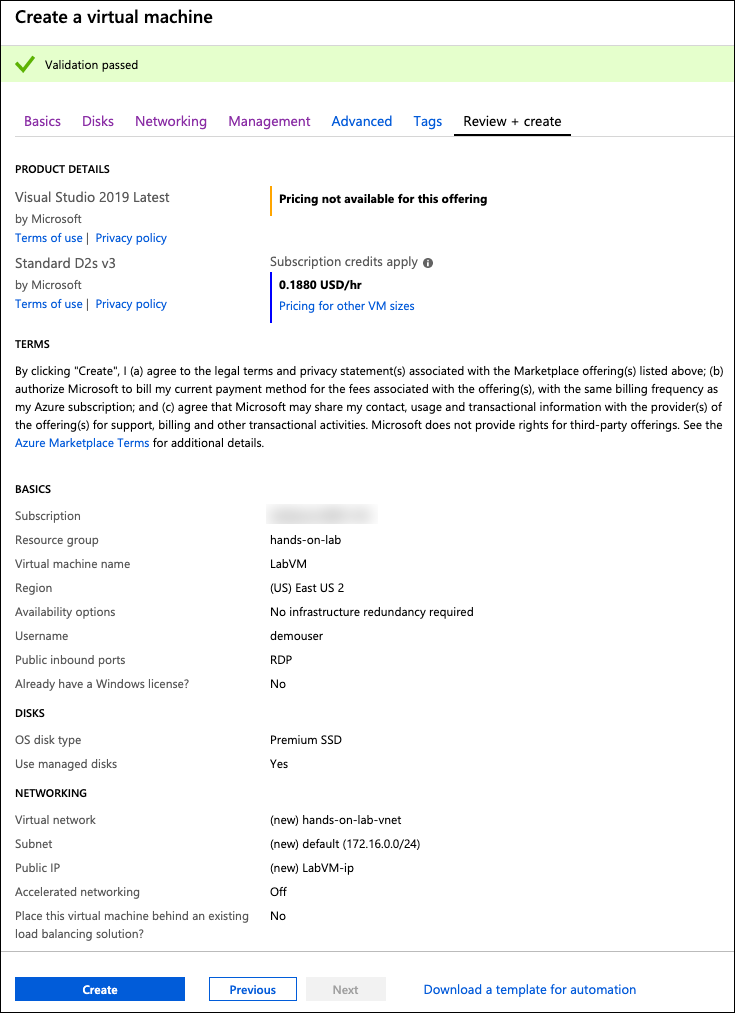
    The Review + create tab is displayed, with a Validation passed message.
    The Review + create tab is displayed, with a Validation passed message.
  7. It takes approximately 5 minutes for the VM to finish provisioning.

Task 12: Connect to the Lab VM

In this task, you create an RDP connection to your Lab virtual machine (VM).

  1. In the Azure portal, select Resource groups from the Azure services list.

    Resource groups is highlighted in the Azure services list.
    Resource groups is highlighted in the Azure services list.
  2. Select the hands-on-lab-SUFFIX resource group from the list.
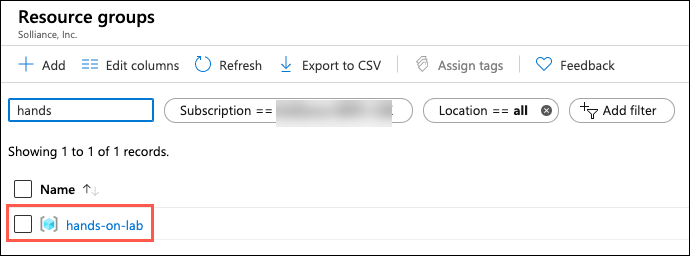
    The “hands-on-lab-SUFFIX” resource group is highlighted.
    The “hands-on-lab-SUFFIX” resource group is highlighted.
  3. In the list of resources within your resource group, select the LabVM Virtual machine resource.
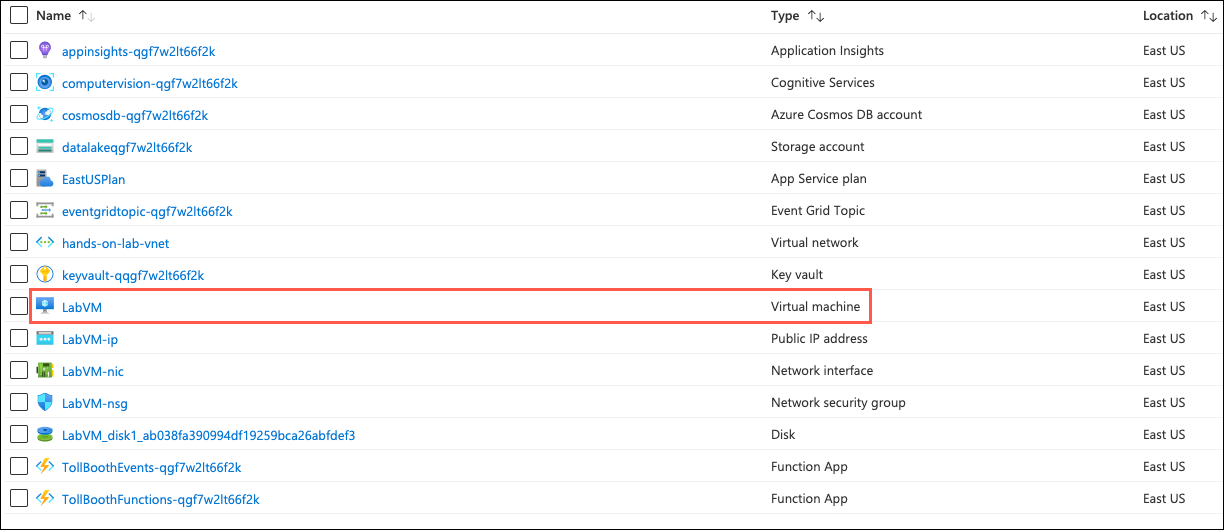
    The list of resources in the hands-on-lab-SUFFIX resource group are displayed, and LabVM is highlighted.
    The list of resources in the hands-on-lab-SUFFIX resource group are displayed, and LabVM is highlighted.
  4. On your LabVM blade, select Connect and RDP from the top menu.

    The LabVM blade is displayed, with the Connect button highlighted in the top menu.
    The LabVM blade is displayed, with the Connect button highlighted in the top menu.
  5. On the Connect to virtual machine blade, select Download RDP File, then open the downloaded RDP file.
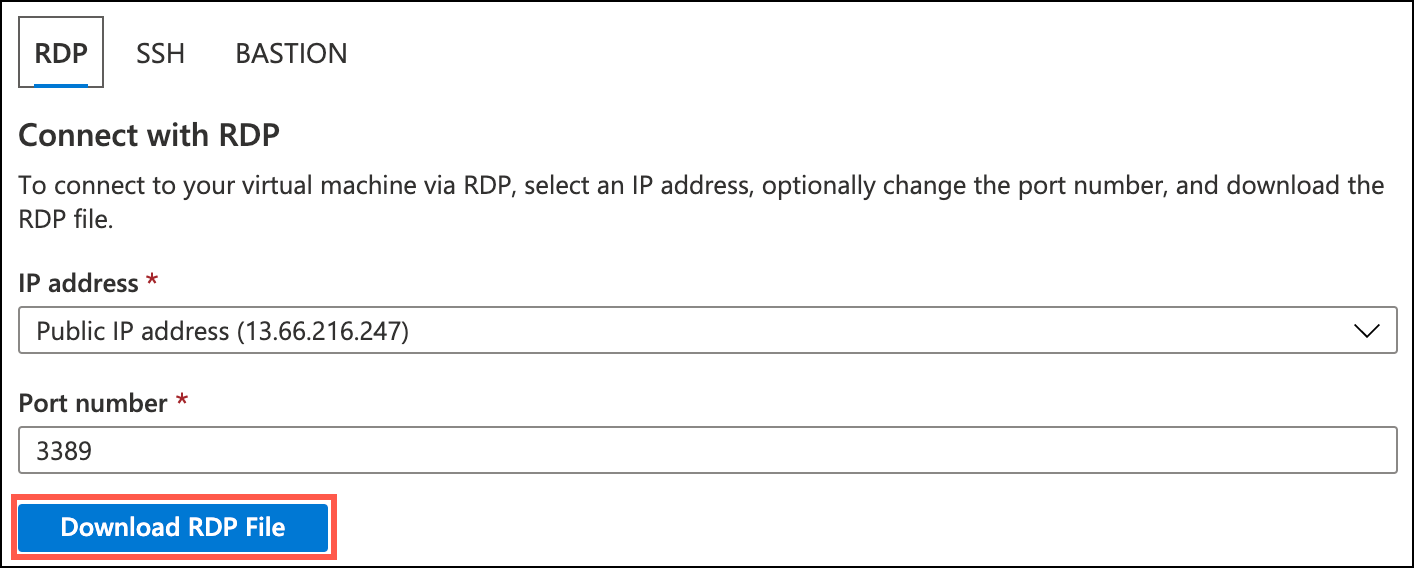
    The Connect to virtual machine blade is displayed, and the Download RDP File button is highlighted.
    The Connect to virtual machine blade is displayed, and the Download RDP File button is highlighted.
  6. Select Connect on the Remote Desktop Connection dialog.
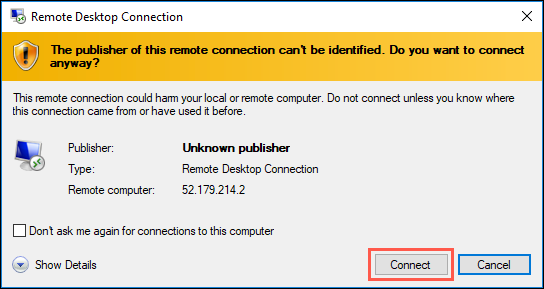
    In the Remote Desktop Connection Dialog Box, the Connect button is highlighted.
    In the Remote Desktop Connection Dialog Box, the Connect button is highlighted.
  7. Enter the following credentials when prompted, and then select OK:
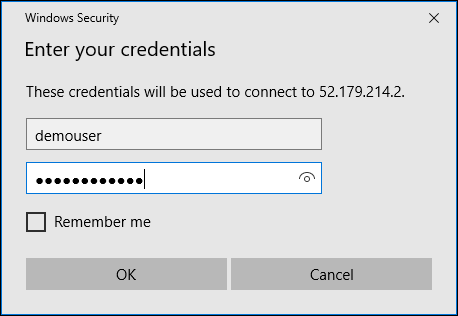
    The credentials specified above are entered into the Enter your credentials dialog.
    The credentials specified above are entered into the Enter your credentials dialog.
  8. Select Yes to connect if prompted that the remote computer’s identity cannot be verified.
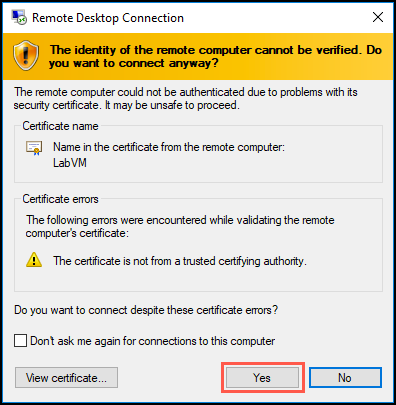
    In the Remote Desktop Connection dialog box, a warning states that the remote computer’s identity cannot be verified and asks if you want to continue anyway. At the bottom, the Yes button is highlighted.
    In the Remote Desktop Connection dialog box, a warning states that the remote computer’s identity cannot be verified and asks if you want to continue anyway. At the bottom, the Yes button is highlighted.

Task 13: Disable Internet Explorer Enhanced Security

In this task, you disable Internet Explorer Enhanced Security Configuration (IE ESC) on the LabVM.

Note: Sometimes this Visual Studio 2019 Latest image has IE ESC disabled already, and sometimes it does not.

  1. Once logged in, launch the Server Manager. This should start automatically, but you can access it via the Start menu if it does not.

  2. Select Local Server, then select On next to IE Enhanced Security Configuration.
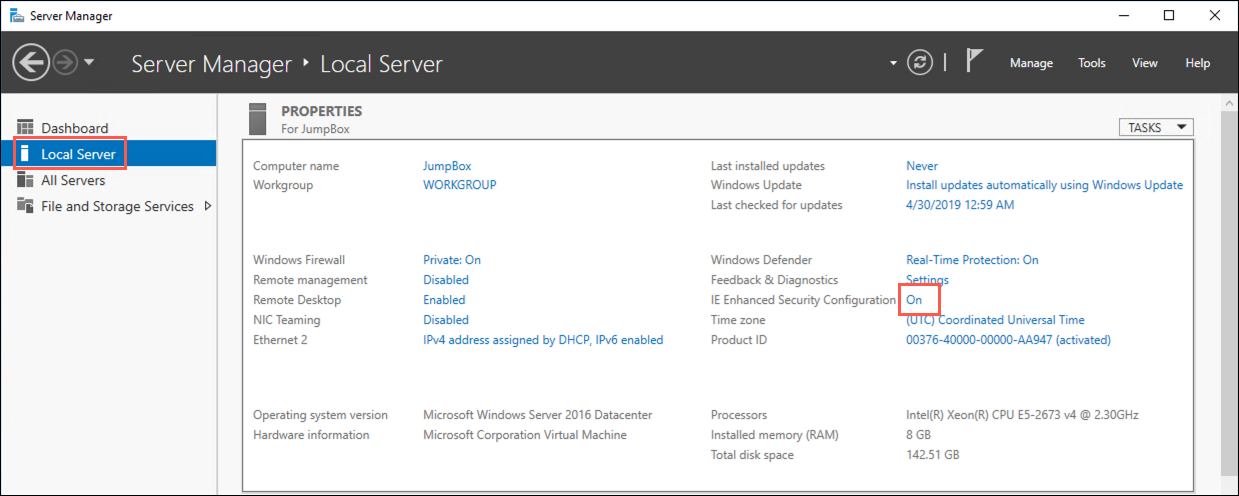
    Screenshot of the Server Manager. In the left pane, Local Server is selected. In the right, Properties (For LabVM) pane, the IE Enhanced Security Configuration, which is set to On, is highlighted.
    Screenshot of the Server Manager. In the left pane, Local Server is selected. In the right, Properties (For LabVM) pane, the IE Enhanced Security Configuration, which is set to On, is highlighted.
  3. In the Internet Explorer Enhanced Security Configuration dialog, select Off under both Administrators and Users, and then select OK.
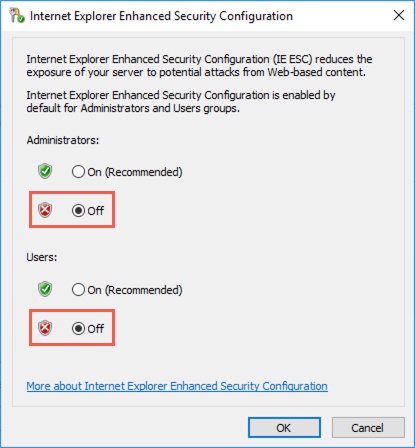
    Screenshot of the Internet Explorer Enhanced Security Configuration dialog box, with Administrators set to Off.
    Screenshot of the Internet Explorer Enhanced Security Configuration dialog box, with Administrators set to Off.
  4. You can close the Server Manager but leave the connection to the LabVM open for the next task.

Task 14: Install required software on the LabVM

In this task, you configure the LabVM with the required software and downloads. First, you download and install the Microsoft Edge web browser. Next, you download a copy of the Visual Studio starter solution and unzip it into a folder named C:\ServerlessMCW.

Note: Some aspects of this lab require using the new Microsoft Edge (Chromium edition) browser. You may find yourself blocked if using Internet Explorer later in the lab, as Internet Explorer is not supported for some specific activities.

  1. To install Microsoft Edge, launch Internet Explorer on the VM and download Microsoft Edge.

  2. Run the downloaded installer and follow the setup instruction.

  3. Next, download a copy of the Serverless Architecture MCW GitHub repo.

  4. Extract the download ZIP file to C:\ServerlessMCW.
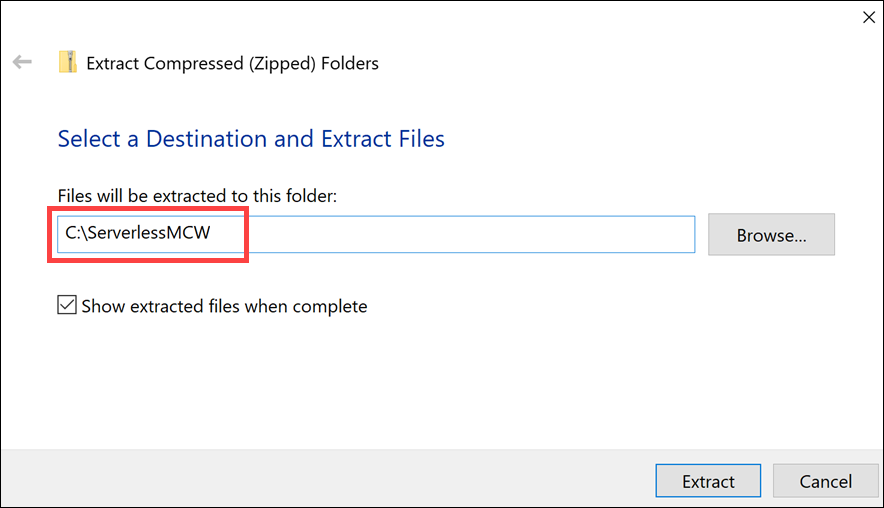
    The Extract Compressed Folders dialog is displayed, with C:\ServerlessMCW entered into the extraction location.
    The Extract Compressed Folders dialog is displayed, with C:\ServerlessMCW entered into the extraction location.